 |
|
Seven Tips to Improve Your Realtor Listing Flyers |
 |
Beautiful flyers start with good photos. Even if your new real estate listing isn't a professionally decorated and landscaped million dollar home, you can still take photos that will emphasize the positives and play down the negatives. There are several things to consider as you take those most important photographs, and following a few simple guidelines will help ensure all your pictures will enhance, and thus help sell, your new listing.
Clutter is distracting. Remove everything from counters and tables, store toys in a basket or bin, and stuff all that bathroom clutter into the nearest drawer. Focus on counters in the bathroom and kitchen, for nothing ruins a great photo more than a can of hairspray sitting in plain view. Consider replacing the clutter with fresh flowers in an attractive vase, setting the table, and closing all closet doors. Despite what you're heard, it IS the little things that sometimes do make the biggest impact- good or bad. 2. Find the Best Angle Digital cameras are great because you can instantly see whether or not the picture you just took will appeal to your buyers or repel them. Try standing in different spots, turn the camera sideways, avoid making the television the central feature, don't stand right behind the couch - these are a few pointers to keep in mind. You can always delete any photo, so take more, not less! 3. Remove the Date Stamp! Turn off the date stamp feature on your camera. Yes, the date can be removed by someone who has the software to do so, but most people don't. If you post the photos online, your potential buyers see when you took the picture, and what if the house has been on the market for months? Plus, the bright yellow or orange numbers can ruin an otherwise nice photo. 4. Open the windows, Turn on the lights Natural sunlight is the best lighting for any picture. People want houses that are bright with sunlight, but turning all the lights on in a room (if it's dark outside or the room has little natural light) can achieve almost the same results. However, if the only light source is the window, and you don't use the flash, then the only bright spot in the photo will be the window. So, turn the overhead lights on, turn on the lamps and any other light source you can find. The more lights, the better your photo will be. 5. Choose the Best Rooms & Features to Highlight Not every room in a home needs to be photographed. There are some rooms that should be seen only in person, and after a new coat of paint, a massive clean-up, and maybe even new furniture. Why take photos of rooms that will turn potential buyers away? Instead, focus on the house's best features, and drop a few hints to the seller, like, "I know this great painter...." 6. Make the Photo Count There is a limit to how many photos you can post online with your listing, so make all your photos show something good, make them work for you, and not against you. 7. Improving Outside Photos The front of the house is probably the most important photo of all, and for outside photos, the best thing to do is check the weather report. Bright sunlight, maybe some fluffly clouds in the sky, that's the ideal setting for any outside photo. Don't take pictures at dusk or at night, unless it's for a special effect, for drama. Unless the house has great outside lighting, it will just look gloomy. - Kimber Malone |
|
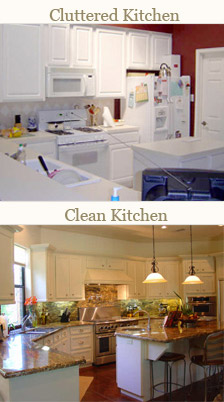 1. Setting the Stage